One of my favorite old fashioned recipes, has to be this one. Not only good but good for you! Great comfort food.  CROCK POT "ONE POT" DINNER | |
1/2 to 1 lb. ground beef
3/4 lb. bacon, cut in sm. pieces 1 c. chopped onion 2 (1 lb. 15 oz.) cans pork and beans 1 (1 lb.) can kidney beans, drained 1 (1 lb.) can butter lima beans, drained 1 c. catsup 1/4 c. brown sugar 1 tbsp. liquid smoke 3 tbsp. white vinegar 1 tsp. salt Dash of pepper 
Brown ground beef in skillet, drain off fat and put beef in crock pot.
Brown bacon and onions, drain off fat. Add bacon, onions, and remaining ingredients to crock pot. Stir together well. Cover and cook on low for 4-9 hours. Feeds a crowd. Enjoy and Happy Memorial Day, God Bless Our Troops! | |

Sunday, May 24, 2015
The best old fashioned recipe ever!

Thursday, May 14, 2015
Pinterest How to Guide with Pictures!!
PINTEREST HOW TO GUIDE WITH PICTURES
I’ve been hearing from a lot of my friends, about not being able to use Pinterest. Some have tried and given up and others won’t even try. My goal is to make it as easy as possible and I’ll be with you, every step of the way. So don’t worry if you get lost or have questions. You can always message me at Pearlbeforeswine@gmail.com and I will do my best to help you. I absolutely love Pinterest, as you’ll soon see and want everyone to be able to enjoy it I like do. If you still aren’t on, that’s okay too!! J
I took a bunch of pictures and will explain them all as we go.
Step one
1. Sign up or log in.
When I first created my account, I wanted something easy for me to remember. I have a ton of passwords to remember and didn’t want to add anymore to the mix. So, I chose to Continue with Facebook. Once you click that, a small page will popup asking for your permission to add Pinterest. Allow and continue and it brings you back to the Pinterest home page or your account page.
You can, if you like, to sign up with just your email and a password or with Google Plus. Which would be your google Gmail account log in.

Let’s continue, the next few steps are really easy!
Step 2
Once signed in.
This is my home feed on Pinterest, after I have logged in. As you can see, my name is on the Top Right and other Facebook friends of mine are on the left. You can invite them or follow them if they have already created an account on Pinterest.
Now, the pictures or pins you see are from either me or other friends and people I’m following. It updated it’s self when someone pins to their boards. You will see your own pins here as well. Friends of yours or followers can then re-pin them to one of their boards or they can heart it. This means you love it.


Towards the top of the page you can see a menu with an arrow facing down. If you click on that, it brings down this menu you see below. Those are different categories that Pinterest has made already. You can go into any one of those and find some pretty cool things. My favorite thing to do, when I log in, is go to the menu and I pick Popular. This brings up everything that is most popular or been recently re-pinned the most. I’ve found so many great things there.

You may also notice my name and a red rectangle with the number 7 in it. If you click on your name, you’re brought to your page. If you click the rectangle, you are brought to a new page with messages from others that have liked your pin or pins and or have re-pinned them to their own boards. You will also get notified who follows you. You can send or check your messages from there as well. It is basically a news feed, about others you follow, people who have followed you and messages from other Pinterest users.
The picture below shows my main page, after clicking on my name from the page above.

In the picture above, you can see my name Pearl before Swine, where I’m from, somewhere warm and a website that I have. I also linked my twitter and Facebook accounts to Pinterest as well.
In red you can see I have created 130 boards, have pinned 3,0877 pins and have liked 6,634 pictures. Which have not been put into individual boards already created or I may need to create a new board. You can see how many followers I have, 201 and how many people I’m following, 298. I try to follow almost everyone who follows me. I think it’s just polite. Now if I can’t stand their pins, well then….I un-follow them. I know, I don’t like to do it and is reserved for rare cases. Most people I don’t have a problem with.
Step 3.
Let’s start creating and pinning…the fun part!
This can be the hard part for you, so I’ll go slow and try to explain everything, so it’s clear.
First I want to cover what are boards?
A board is created by you. You can name it what you want and you can pin different pictures to it.
Board Facts you may not have known:
You can create boards with other people. I have several boards that either my mom created or I created, and you can add people to allow them to pin to a specific board. I have other boards that I share with 2,000 or so other strangers. It is a recipe type board for desserts.
You can also create Secret boards for just you or just you and someone else. Only people you invite can see these boards.

Step 4
Create a board

Pick a name, add description, chose a category that best fits your board, so others are able to find those pins too.
From here you can add friends or collaborators to pin to that board as well. Just add their email address and an email will be sent to them asking them to accept.
You can also choose if others can invite other people to pin to that board as well. So you can have multiply pinners to one board.
Now if you are making a board about traveling or your home state? A favorite destination spot? Pinterest has given you an option to add a map to the board. Which I think is totally fun. So, I follow you and click on your board about Hawaii and you’ve added a Hawaii map to that board, I’ll see that on the top. Kind of like a background for your board. It’s pretty cool, if you ask me. Just another added special touch to your boards.
Here is where you can also choose to keep it secret. Like personal family trip photos, you don’t want public but can add other family members to see or just your eyes only. I’ve created various types of boards for just myself but I’m not telling …..That’s a secret!! J

Yay! So, okay…you’ve created your first board. Now what?
Now the fun begins!! I love creating boards and I love, love to pin to them even more. Hence is why I have a hundred and thirty of them and over six thousand likes, yet to be pinned. I’m a busy girl and never seem to have time to organize them. I normally take a Sunday afternoon and will go through them and organize them into their proper boards. It’s a relaxing thing for me and pretty mindless once you get the hang of it.
Next is pinning, and how to even find things to pin. So let’s talk again about the Pinterest menu and it’s categories. When you first create a board there is nothing in it and it has no picture for the cover, unless you choose one when first creating your board. So the first pin you pin into it will then become the cover photo, unless one has been already chosen. If you like or want your boards to be cool or pretty, then I suggest pinning your first pin with one that you really like. If not, then just start pinning away.
Below I’ve included a picture of Pinterest’s categories and what their names are. Like I said in the beginning, I normally chose the popular category. Only because I get really lucky there every time and find awesome stuff.
If I have a certain thing in mind then I will go to the search bar, at the top and type that in. Below I’m doing a search on Wedding Ideas. Once typed into the search bar, many other options come up.
Do you want wedding ideas on a budget, wedding ideas purple, wedding ideas blue…etc..

Click on either the search button to continue with your search or you can choose one from the list that appears. You’re then brought to those keywords that matched your search.
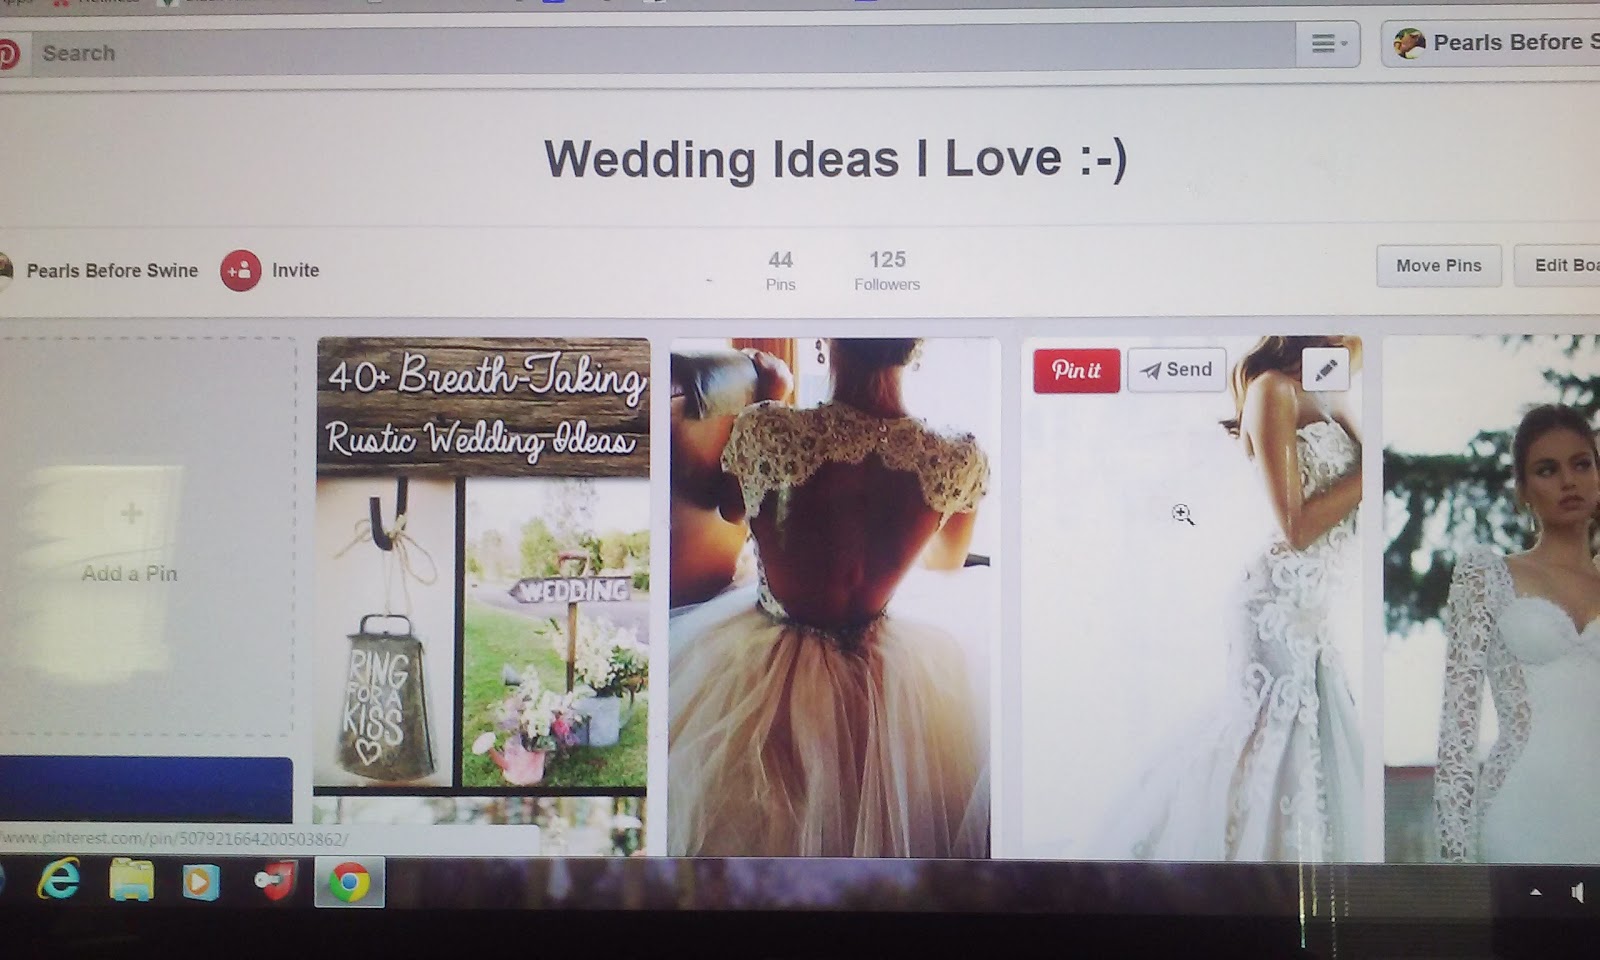
One of the boards I created was, Wedding Ideas I love. Today, I’ll show you step by step how to pin to a specific board. We’ll use this board below.

From this board you can search an idea, search a category or per picture above, you can
Add a Pin.
If you click on, add a Pin. This box pops up and asks, do you want to pin from the web or your device. Which would be your phone, your computer; laptop, kindle or what have you.

If you choose web, you are then brought to your internet search page and you can do a search for a specific website that you like. You can search the internet for what you’re looking for, most website now have a pin it button.

Just click the pin it button and you’re brought to a page for you to pick the board you want to pin to. It’s
that easy.


I really liked this rustic wedding ideas pin and so I’m going to pin it to my board called Wedding ideas I love.

A confirmation will popup and say Saved to and the board you saved that pin to.
Now if you are like me and are super busy. I will quickly skim my home feed or a category I like and If I’m running out of time, I will just click on the heart. Which is then saved under my likes on my main board. page.

Saved here -----v

Below is a picture of it saved under my likes. I really do need to go through these. Oh my!!
Whatever is highlighted red is where you are. So as you can see, my likes are red and if you look, there is that rustic wedding ideas pin that I liked.

If you remember, we pinned this as well into Wedding Ideas I love and from the picture, you can see that has been pinned as well.
Now you can just keep creating more boards and pinning your little hearts out. I love Pinterest, I’ve found more ideas and DIY’S, then you can shake a stick at and a ton of really useful information. Health, home, family, baking, cars, guns….it doesn’t matter. It’s there and ready for you to pin it.
If you found this helpful or have any questions, I’m here to help. Reach out to me via email, Pinterest or Facebook. I’ll do my best to help and really want this fun for all.
If I missed something and or you just need more information, reach out to me…again I’m here and willing to help. No question is stupid and we’ve all been there.
Thank you so much for reading, and please share if you think it may be useful to someone else!
Much love, Jenny
Sunday, April 26, 2015
It's National Pretzel Day!! Enjoy with this easy recipe! :)
Hot Buttered Pretzels
Yummy soft baked pretzels just like the ones at the mall. They are much better than the ones that you buy at the mall, and are so easy! They are cheaper to make at home too.
Ingredients
All purpose flour 1-2 1⁄2 Ounce (for dough)
Sea salt 1 Teaspoon (for dough)
Sugar 1 Teaspoon (for dough)
Instant yeast 2 1⁄4 Teaspoon (for dough)
Warm water 1 1⁄2 Cup (24 tbs) (1 cup for dough 1/2 cup for topping)
Baking soda 1 Tablespoon (for topping)
Vegetable oil 1 Tablespoon (for greasing)
Unsalted butter 3 Tablespoon

GETTING READY
1. Preheat oven to 500 degree.
2. Grease a baking sheet with vegetable oil. You can also use parchment paper to line it.
3. For topping, in a bowl, whisk warm water and baking soda. Microwave for 1 minute, and keep it aside.
4. For dough, in stand mixer bowl, add flour, salt, sugar, and instant quick rise yeast.
5. Pour warm water in it, and stir with spatula to incorporate.
6. Then, using a dough hook attachment, knead the mixture on medium low for 5 minutes, or until the dough is soft and smooth, but not stick.
7. In a plastic bag, put the dough, and allow it to rise for about 30 minutes.
8. Remove the dough from plastic bag, and place it on oiled working counter.
9. Using a knife divide the dough into 8 equal pieces.
10. Roll these pieces into long rope.
11. Shape each rope into pretzel, dip each pretzel in baking soda wash, and place it on baking sheet.
13. Sprinkle salt over it, and allow it to rest for about 10 minutes.
14. Place it in oven and bake for 9-10 minutes, or until pretzels are fluffy and golden brown.FINALIZING
15. Remove the sheet from oven, and brush butter over hot pretzel.
SERVING 4.
Serve pretzel with hot tomato soup.
Recipe Summary
Difficulty Level:
Medium
Cuisine:
Preparation Time: 50 Minutes
Cook Time: 15 Minutes
Ready In: 65 Minutes
Servings: 4
Saturday, April 25, 2015
If you love old vintage tees, keep reading.....
So I recently got my vintage tees from Predisposed Vintage. These are hands down my favorite tees I've ever owned. The material is so soft and light weight and the designs are amazing!!
Stop by their store and check out the bargain bin, everything there is $5, and shipping is super cheap!
These are the shirts I just got from them below.


Stop by their store and check out the bargain bin, everything there is $5, and shipping is super cheap!
These are the shirts I just got from them below.
 |
| Great for a night shirt! |
 |
| My all time favorite one! |
 |
| What I'm wearing today! |
**Product Review** ERA Ageless
I'm super excited to talk about Era Ageless. One because I think it's a great product and two I think it even works!! I know, I know...for all you unbelievers out there but this one might just actually work.

I have before and after pics, so you can judge for yourself. Completely untouched!
So lets get started.....
This picture below is what I was sent. It's a sample pack of different products.

Ok, so what I love about the products. First thing you notice is..well for me anyways is smell. I smell everything. It's not overpowering or too fragrant. Which really bothers me about other products. I don't want something too smelly on my face, it goes near yours eyes for goodness sake! So I was really happy with that.
Another thing I noticed was how soft the creams and gels are. Especially the eye serum. Which is by far my favorite of all the products so far. It's like rubbing silk on your eyes. Absolutely fab!
Every one of the products absorbs really well. You're not having to rub and rub your face to get it all massaged in. Another great thing!
Now, I've only been using this for a week and I'd have to say in all fairness, you probably want a bit more time trying a product before determining it works or doesn't work. On this case though, I'd have to disagree.
My face seems more glowy and I even got a compliment from a family member that said my face looked great and glowing. So I'm not even the only one who noticed...pretty cool!!
Here are my before and after photos!

.jpg)


Want a free makeup brush? Click here!
So lets get started.....
This picture below is what I was sent. It's a sample pack of different products.
- Facial Peeling Gel
- Facial Peeling Gel
- Elastin & Beta Carotene Mask
- Moisture Cream
- Facial Serum
- Eye Serum
- Eye Cream
  |
| UPLIFT EYE SERUM |
Another thing I noticed was how soft the creams and gels are. Especially the eye serum. Which is by far my favorite of all the products so far. It's like rubbing silk on your eyes. Absolutely fab!
Every one of the products absorbs really well. You're not having to rub and rub your face to get it all massaged in. Another great thing!
Now, I've only been using this for a week and I'd have to say in all fairness, you probably want a bit more time trying a product before determining it works or doesn't work. On this case though, I'd have to disagree.
My face seems more glowy and I even got a compliment from a family member that said my face looked great and glowing. So I'm not even the only one who noticed...pretty cool!!
Here are my before and after photos!

.jpg)
Another great way to stay ageless is exercising! Only $19 dollars to get started!


Visit them here to order yours!
Want a free makeup brush? Click here!
 |
| REFRESHING ROSE WATER |
Attention Pool Owners with kiddos!! You'll love this idea!
All the pool owners out there, do I have something for you!!!
I know from experience with my own kids that the pool cleaner vacuum can be scary and intimidating. My girls always asked, "Can you take Agador out?" Agador is what we called our pool cleaner, it's from the movie The Birdcage. Agador was their pool cleaner, LOL!
Ok, so now you know alittle about my weirdo family, we really are quit normal...I swear!! :) Although we do reference movie quotes often.
Back to the cleaner, my friend Kiley has been working super hard on a new pool cleaner cover. Not only is it super cute, it's easy to install (NO TOOLS!!), and fit's 80% of the cleaners out there already. Probably even yours!!
 Photo courtesy of Kover Kritters
She does need all the help she can get to get this started. If you could, please share this post with your friends and family. Pledge anything you can, especially if you own a pool yourself. There are really great prizes and know that you are supporting a good cause.
Watch the video, go and sign up, Pledge and share, share, share!!
Only 28 days left before the campaign ends....the time is a ticking away! Visit them online at http://www.koverkritters.com/
I know from experience with my own kids that the pool cleaner vacuum can be scary and intimidating. My girls always asked, "Can you take Agador out?" Agador is what we called our pool cleaner, it's from the movie The Birdcage. Agador was their pool cleaner, LOL!
Ok, so now you know alittle about my weirdo family, we really are quit normal...I swear!! :) Although we do reference movie quotes often.
Back to the cleaner, my friend Kiley has been working super hard on a new pool cleaner cover. Not only is it super cute, it's easy to install (NO TOOLS!!), and fit's 80% of the cleaners out there already. Probably even yours!!
She does need all the help she can get to get this started. If you could, please share this post with your friends and family. Pledge anything you can, especially if you own a pool yourself. There are really great prizes and know that you are supporting a good cause.
Watch the video, go and sign up, Pledge and share, share, share!!
Only 28 days left before the campaign ends....the time is a ticking away! Visit them online at http://www.koverkritters.com/
 |
| Kover Kritters |
Wednesday, April 15, 2015
Don't Waste Biscuit Dough!

Dear Folks,
Today we're going to talk about biscuits with a real southern accent!
Normally when we make our dough we use a biscuit cutter, then re-roll the leftover dough and cut some more.
If you really want fabulous biscuit my tip is *touch them as little as possible with your hands. The heat of your hands breaks the dough down. Same as does a rolling pin.
No fears though, I've found a way to prevent it. Flatten it with a rolling pin or even better a fruit jar filled with ice water (capped, of course!)
Then with a butcher knife cut the blobs of dough into squares, triangles or rectangle pieces. Place each piece in your pan.
For real brown biscuits, on all sides, place them on your cookie sheet a few inches apart.
For soft edges, place the biscuits close together.
Here is the way you are saving time. No re-rolling dough, no cleaning the biscuit cutter! Wallah!
.jpg)
Cook until slightly brown or more golden brown if you like. They can be served right away, cooled or even frozen to be used later.
Wanna get real crazy with the biscuits? Cut up some cold cuts, slice the biscuit in half, add your fixings and enjoy! Yummy no muss, no fuss and easy snack.
Recipe:
2 cups flour
1/2 tea salt
1/2 tea cream of tartar
4 tea baking powder
2 tea sugar
1/2 cup shortening
2/3 cup milk
Sift dry ingredients into a bowl. Cut in shortening until mixture resembles coarse crumbs. Add milk and stir until dough follows fork around bowl.
Knead slightly. Pat out on lightly floured surface and cut. Bake on an ungreased cookie sheet at 450 degrees for 10-12 minutes, or until golden brown.
To reheat leftover biscuits, wrap in foil and heat in 300 degree oven for 10 minutes. Open foil halfway through heating if you want them crisp.

Friday, April 10, 2015
Dog Training made easy!
This site is so wonderful. They gave me so many great and useful tips that I could use to train my two younger adult dogs. My mom and I rescued them last year, along with their mom and two other siblings. Since then, we've found homes for the two sibs, kept the other two boys and my Mom and Dad have mama. She's such a heart and is quit happy in her new home.
The boys, who's names are Malachi and Bear, are also very happy but I had to admit that I didn't do too great of a job in the training department. I felt so bad about how we found them, I just couldn't be hard on them. My fault...I know!
So now, let's just say these two boys are naughty! Counter surfers, garbage destroyers and never ending chewers but I'm head over heels for them. Just a little training wouldn't hurt!
I found these guys and have been applying so of their tips and methods. So far, things seem to be going good. Boys are learning and are defiantly more obedient. I would recommend them to anyone with a dog and or new puppy. :)

The boys, who's names are Malachi and Bear, are also very happy but I had to admit that I didn't do too great of a job in the training department. I felt so bad about how we found them, I just couldn't be hard on them. My fault...I know!
So now, let's just say these two boys are naughty! Counter surfers, garbage destroyers and never ending chewers but I'm head over heels for them. Just a little training wouldn't hurt!
I found these guys and have been applying so of their tips and methods. So far, things seem to be going good. Boys are learning and are defiantly more obedient. I would recommend them to anyone with a dog and or new puppy. :)
Monday, April 6, 2015
"How to make $1000 a month by working at LinkFromBlog!
"How to make $1000 a month by working at Linkfromblog" and "Tips For Successful Blog Advertising"
Follow the link for more information. I just signed up and I love them already!


JewelScent Candles, Aroma Beads, Soaps and More! Ring Worth $10-$7500 in each ONE!
For my birthday this year my mama bought me some Jewel Scent candles, aroma beads and a body scrub. She is the best Mom ever, right?! Most giving person I know. :) Love you Mom! <3 font="">
Let me first start off by saying what a neat idea, and they are so fragrant and long lasting.

Best part is, in every one there is a mystery ring inside. Worth between $10 and up to $7500.00. I think I'd have a stroke if I found a real expensive one.

Very strong, fragrant grape smell.
Fills the whole house for hours!
So below I've posted some of there specials for today and a link so you can get some too!
Great and super easy gift ideas. You pick the ring size and they try real hard to make sure that's what you receive. All mine have been size five so far, which is my ring finger size. So I'm HAPPY, HAPPY!!

I don't own any expensive jewelry and for me that works. I'm not a big jewelry person and if I did own something pricey, I'd probably store it away for safe keeping. Which I'd never find again because I put it in "a safe spot". Get's me every time! :)

This is one of my favorite smells.
Today's 4/6/15 Specials


So amazing, I put it in my car!
JewelScent Shop Now!
Subscribe to:
Posts (Atom)