/> Pearls Before Swine

Thursday, September 3, 2015

I'm calling you out!!!

I'm calling you out...


I think it's about time we discuss your driving...

Now, not all of you are horrible drivers and as we talk further, I'm sure...you'll know who you are...

Where do I begin? Let's just start with this weeks drivers.


Yesterday, we are driving on the 1-17 heading to court downtown. I'm in the middle lane. Driving. Minding my own business...when suddenly I almost get side swiped by a car to my left. I swerve, she misses...I'm pissed!

Now a common mistake, I can over look no problem but this was different. 


What do you do next? Yes, oh course! You pull right up next to them. You have to see what or why, what they are doing????

You wanna know what she was doing? Something I've never seen before while driving...

FLOSSING!!!! Oh my nasty are you serious!!!! I couldn't believe it. I was shocked, discussed. Not only is that one of the dumbest things I've seen. It's also very unsanitary. She's not washing her hands. So her nasty, plaque infested hands are going to touch everything. The entire day. I'm horrified just reliving the experience.

Seriously, please...for the health of those around you. Stop it, it's gross!!!!!!!!!!

The next driver is very common. You've seen them, probably daily.
The texters! You always know who they are. They are the ones, that at a stop light, who are always about half a football field length away from the vehicle in from of them. Never drive the speed limit. Yet use the left lane...drives me crazy.

Literally, it's everything within me to not honk my horn like a psycho. Waving my arms about and pointing.

Please, please...for your safety and mine. Please don't text and drive. Have you not seen those horrible commercials? So scary and you'd feel so bad, if you hurt someone or yourself.

Think about others when out driving. Some people are carrying precious cargo. Cargo you can't replace. Like children, parents, pets and you. Life is valuable and a gift. Don't mess that up for you or anyone else.

I won't go into other horror stories but will call out the rest of you, in my list below. This us a message from ALL of us and we are sick of your bad driving.


The eaters
The no signal users
The turn that shit music down, we don't wanna hear it.
The flossers
The texters
The makeup artists
The aggressive women
The oldies

You are all called out! Please discontinue and just drive.
All who agree, share! 

d5704448da271cb3c247cea946036c380caed34d0ed99b45f4

Monday, August 10, 2015

My attempt at a Gas Station Burrito.

We have this gas station near our house and literally there are tons of people, in line everyday for these burritos. They are a little hot and spicy, which normally is not my thing but they are so good. It's like this thick meat, sauce thing, with peppers and believe it or not...they don't have any cheese. I know...get out, right? Trust me they are fabulous.

 So of course, I thought to myself....I can do this. I don't know if you're like me but I am always taking food ideas and giving it a try. It's fun and most of the time I feel mine is better. Ha!

This still does need some tweaking but all in all they were very good. I did end up adding cheese and sour cream to mine. Which real made it even better, to me. You may just like it without.

First is the ingredients, I ran down to the local grocery store and picked up some:


 Some spices I used are, salt, pepper, parsley, garlic salt, chopped onions, ground pepper and Mexican oregano.


2 Jalapenos
2 Small Tomatoes
1 Large Onion
3 Cloves Garlic
3 Tomatillos
2 packs Thinly Cut Steak
3 New Mexican Chile's (soaked in water to soften)


What I did first was wash all the veggies and then sliced then in half, except the garlic cloves. I place those cut pieces on a greased pizza pan or you can use a cookie sheet. If you'd like to use a grill, you can do so as well.


 Be sure to salt and pepper all the veggies before roasting. It helps release more of their natural flavors. If you want your sauce even hotter, then leave the seeds in the peppers and jalapenos. The seeds add the heat!


Place in oven at 450 degrees for 10-20 mins and watch them. You just want them a little bit blacked but not too much or your sauce will come out bitter.


 Roasted and done. Could have gotten them a little bit darker. Next time, I'll let them go a tab longer.


Next, I chopped up the steak in small pieces and browned that in the frying pan. I added salt and pepper to that as well.


For the sauce, I used my blender and added all those nicely toasted veggies into the blender to blend. 


After everything is blended well, you'll have something like this. 
Next I get out the old crock pot and place my cooked meat inside and cover with the red sauce we just made. Turn that baby on high and simmer for hours. I let mine go a good 3-4 hours. It really tenderizes the meat and cooks down some of the spiciness.  

I make sure and taste and stir as it cooks. You may need to add more salt or other spices per your liking. 


Looks a little like chile but doesn't taste like it. This is spicy hot and full of delicious flavors. 


Any suggestions are always welcome, just comment or email me at pearlbeforeswine15@gmail.com. If you have any recipes you'd like to share, I'd love to do so!! 

Take care and have a great day!! 


Sunday, August 9, 2015

Baked Oatmeal Cookies and fun for kids before school starts!

Baked Oatmeal Cookies

One of the family's favorites and super fun to make with the kids. I like to do mine without raisins and instead I add m&m's. 


Ingredients 
6 cups quick cooking oats
1 1/2 cups milk
4 eggs, lightly beaten
2/3 cup chunky applesauce
1/2 cup brown sugar
1/3 cup butter
1/4 cup white sugar
1 Tbsp baking powder
1 1/2 tsp cinnamon
1 tsp vanilla extract

Directions
Prep time: 10 minutes
Cook time: 20-30 minutes
Ready in about 30-60 minutes

Preheat oven to 350 degrees F (175 degrees C). Grease a 9x13-inch baking dish.

Mix oats, milk, eggs, applesauce, brown sugar, butter, white sugar, baking powder, cinnamon, and vanilla extract together in a bowl until oats are evenly moistened; pour into prepared baking dish. 

Bake in the preheated oven until set and just golden brown, 20 to 30 minutes.


Super easy and a great way to spend some time with the kids before they go back to school.


How to roast fresh chiles at home.....and then make a red sauce with them!


How to Roast 
chiles at home

It’s easy in an oven, on top of a gas stove, or on an outdoor grill.


Let’s start with green chiles, the ones most frequently roasted. Plan on twenty minutes for oven roasting, putting the green chiles in a single layer on a baking sheet and blistering them at 450° F until the skins have blackened in many spots. Turn as needed for uniform scorching until the chiles look collapsed.

If you are only roasting a couple of pods, hold them with tongs over the flame of a gas burner for a few minutes, turning to blacken all over, or use an asador, a wire-mesh griddle.

On a gas or charcoal grill, place the green chiles on the grate over a hot fire, searing them on all sides for about ten minutes. 

Roast fresh red pods the same ways, but their higher moisture content will keep them from blistering and blackening as fully. To judge readiness, look for loosening skin and a deep brown shade.

How to steam and peel fresh chiles

After roasting chiles, steam them immediately to loosen the skins.
Place pods in a Ziploc plastic bag or a covered bowl and let them sit five to ten minutes or until cool enough to handle.

If dealing with any quantity of chile's, wear rubber gloves to avoid getting capsaicin (the substance that gives the pods heat) on your hands; it doesn't wash off easily and can irritate the skin.

Strip off the peel. You may find yourself wanting to run water over the chiles to help with the process since some peel is bound to stick. Don’t do it any more than absolutely necessary, however, because it dilutes flavor. Instead, rinse your gloved hands under the running water.

Remove stems and seeds unless you are planning to stuff the chiles, in which case it’s better to leave the stem and any seeds still attached to avoid weakening the pod.

Use the sauce in enchiladas, burritos, tamales, or smothered on top of basically anything. This sauce will keep up to 6 days refrigerated and freezes well.

Servings: 4 cups
  • 8 ounces (about 20 to 25) dried whole red New Mexican chile pods, mild, medium, hot, or a combination. 
  • 4 cups water or chicken stock (divided use)
  • 2 tablespoons vegetable oil
  • 1 medium onion, minced
  • 3 garlic cloves, minced
  • 1 to 2 teaspoons crumbled dried Mexican oregano, or marjoram
  • 1 teaspoon salt, or more to taste
Directions
Toast dried whole chile pods in a heavy skillet over medium heat until they are warm and release their fragrance, 1 to 2 minutes per side.

Remove the chiles from the skillet immediately. When cool enough to handle, break each chile pod into several pieces (wearing rubber or plastic gloves if your skin is sensitive), discarding the stem and seeds.

Place half the chile pieces in a blender and pour in one-half of the water or stock. Puree until mostly smooth but with a few flecks of chile still visible in the liquid.

Warm the oil in a large saucepan over medium heat. Add the onion and garlic, and sauté several minutes until the onion is limp.

Pour in the blended chile mixture, then add oregano and salt.

Puree the remaining chiles with the remaining water and pour it into the sauce in the pan. Reduce the heat to medium-low and simmer for a total of 20 to 25 minutes.

After about 15 minutes, taste the sauce and adjust seasonings. When ready, the sauce will be cooked down enough to coat a spoon thickly but still drop off of it easily. 

Use warm or refrigerate for later use

Tuesday, June 2, 2015

Mini Taco Bites...so good and a family favorite!

Mini Taco Bites

Super good and easy to make. A family favorite, and your friends will love it too!

Preheat oven to 350°

Ingredients 
Tortillas (your preference)
Refried beans
Ground beef
Taco seasoning
Lettuce
Onion
Tomatoe
Olive
Chives
Cheese
Sour cream


Ok...let's start! Take your tortillas and use a circle cookie cutter to cut out little circles. If you don't have one, you can use a cup with a thiner edge. 

Place cut cirles in bottom of muffin or cupcake pan. 

You'll also want to brown the ground beef and add taco seasoning. Set a side or keep in pan for use later.

Add the toppings! 
I started with the beans, then ground beef, cheese and then the veggies. Tomatoes, onions, olives, and chives. Plus more cheese to top off. 

Cook in oven for 12-15 mins, when cheese is melted and sides are golden. Remove.

Next, I added the lettuce and sour cream. I didn't want the lettuce to wilt and my sour cream melting everywhere. :)

Nom, nom...eat up and enjoy. So good and easy as pie. 

Thanks for reading! And stopping by. 

Sunday, May 24, 2015

The best old fashioned recipe ever!

One of my favorite old fashioned recipes, has to be this one. Not only good but good for you! Great comfort food. 


CROCK POT "ONE POT" DINNER


1/2 to 1 lb. ground beef
3/4 lb. bacon, cut in sm. pieces
1 c. chopped onion
2 (1 lb. 15 oz.) cans pork and beans
1 (1 lb.) can kidney beans, drained
1 (1 lb.) can butter lima beans, drained
1 c. catsup
1/4 c. brown sugar
1 tbsp. liquid smoke
3 tbsp. white vinegar
1 tsp. salt
Dash of pepper


Brown ground beef in skillet, drain off fat and put beef in crock pot. 

Brown bacon and onions, drain off fat. Add bacon, onions, and remaining ingredients to crock pot. Stir together well. 

Cover and cook on low for 4-9 hours. Feeds a crowd.

Enjoy and Happy Memorial Day, God Bless Our Troops! 

Thursday, May 14, 2015

Pinterest How to Guide with Pictures!!


PINTEREST HOW TO GUIDE WITH PICTURES


I’ve been hearing from a lot of my friends, about not being able to use Pinterest. Some have tried and given up and others won’t even try. My goal is to make it as easy as possible and I’ll be with you, every step of the way. So don’t worry if you get lost or have questions. You can always message me at Pearlbeforeswine@gmail.com and I will do my best to help you. I absolutely love Pinterest, as you’ll soon see and want everyone to be able to enjoy it I like do. If you still aren’t on, that’s okay too!! J
I took a bunch of pictures and will explain them all as we go.
Step one
1.       Sign up or log in.
When I first created my account, I wanted something easy for me to remember. I have a ton of passwords to remember and didn’t want to add anymore to the mix. So, I chose to Continue with Facebook.  Once you click that, a small page will popup asking for your permission to add Pinterest. Allow and continue and it brings you back to the Pinterest home page or your account page. 

You can, if you like, to sign up with just your email and a password or with Google Plus. Which would be your google Gmail account log in.


Let’s continue, the next few steps are really easy!
Step 2
Once signed in.
This is my home feed on Pinterest, after I have logged in. As you can see, my name is on the Top Right and other Facebook friends of mine are on the left. You can invite them or follow them if they have already created an account on Pinterest.
Now, the pictures or pins you see are from either me or other friends and people I’m following. It updated it’s self when someone pins to their boards. You will see your own pins here as well.  Friends of yours or followers can then re-pin them to one of their boards or they can heart it. This means you love it.


 Here you can see some of pins from people I follow. Now, from just looking at this picture I can see two pictures that I would re-pin right away. I love pigs and animals, so I’d re-pin the piggy to a board I named Farm animals and the Tiger, I’d re-pin to a board I named All Creatures Great and Small.  If I wanted to save time, I would just click the heart and it gets saved in all my likes. This is located back on your board’s page or main home Pinterest page, under likes. We’ll discuss that later on, more.

Towards the top of the page you can see a menu with an arrow facing down. If you click on that, it brings down this menu you see below. Those are different categories that Pinterest has made already.  You can go into any one of those and find some pretty cool things. My favorite thing to do, when I log in, is go to the menu and I pick Popular. This brings up everything that is most popular or been recently re-pinned the most. I’ve found so many great things there.


You may also notice my name and a red rectangle with the number 7 in it. If you click on your name, you’re brought to your page. If you click the rectangle, you are brought to a new page with messages from others that have liked your pin or pins and or have re-pinned them to their own boards. You will also get notified who follows you. You can send or check your messages from there as well. It is basically a news feed, about others you follow, people who have followed you and messages from other Pinterest users.

The picture below shows my main page, after clicking on my name from the page above.


In the picture above, you can see my name Pearl before Swine, where I’m from, somewhere warm and a website that I have. I also linked my twitter and Facebook accounts to Pinterest as well.
In red you can see I have created 130 boards, have pinned 3,0877 pins and have liked 6,634 pictures. Which have not been put into individual boards already created or I may need to create a new board. You can see how many followers I have, 201 and how many people I’m following, 298. I try to follow almost everyone who follows me. I think it’s just polite. Now if I can’t stand their pins, well then….I un-follow them. I know, I don’t like to do it and is reserved for rare cases. Most people I don’t have a problem with.
Step 3.
Let’s start creating and pinning…the fun part!
This can be the hard part for you, so I’ll go slow and try to explain everything, so it’s clear.
First I want to cover what are boards?
A board is created by you. You can name it what you want and you can pin different pictures to it.
Board Facts you may not have known:
You can create boards with other people. I have several boards that either my mom created or I created, and you can add people to allow them to pin to a specific board. I have other boards that I share with 2,000 or so other strangers. It is a recipe type board for desserts.
You can also create Secret boards for just you or just you and someone else. Only people you invite can see these boards.


Step 4
Create a board

Pick a name, add description, chose a category that best fits your board, so others are able to find those pins too.
From here you can add friends or collaborators to pin to that board as well. Just add their email address and an email will be sent to them asking them to accept.
You can also choose if others can invite other people to pin to that board as well. So you can have multiply pinners to one board.
Now if you are making a board about traveling or your home state? A favorite destination spot? Pinterest has given you an option to add a map to the board. Which I think is totally fun. So, I follow you and click on your board about Hawaii and you’ve added a Hawaii map to that board, I’ll see that on the top. Kind of like a background for your board. It’s pretty cool, if you ask me.  Just another added special touch to your boards.
Here is where you can also choose to keep it secret. Like personal family trip photos, you don’t want public but can add other family members to see or just your eyes only. I’ve created various types of boards for just myself but I’m not telling …..That’s a secret!! J

Yay! So, okay…you’ve created your first board. Now what?
Now the fun begins!! I love creating boards and I love, love to pin to them even more. Hence is why I have a hundred and thirty of them and over six thousand likes, yet to be pinned.  I’m a busy girl and never seem to have time to organize them. I normally take a Sunday afternoon and will go through them and organize them into their proper boards. It’s a relaxing thing for me and pretty mindless once you get the hang of it.
Next is pinning, and how to even find things to pin. So let’s talk again about the Pinterest menu and it’s categories. When you first create a board there is nothing in it and it has no picture for the cover, unless you choose one when first creating your board.  So the first pin you pin into it will then become the cover photo, unless one has been already chosen.  If you like or want your boards to be cool or pretty, then I suggest pinning your first pin with one that you really like. If not, then just start pinning away.
Below I’ve included a picture of Pinterest’s categories and what their names are. Like I said in the beginning, I normally chose the popular category. Only because I get really lucky there every time and find awesome stuff.
If I have a certain thing in mind then I will go to the search bar, at the top and type that in. Below I’m doing a search on Wedding Ideas. Once typed into the search bar, many other options come up.
Do you want wedding ideas on a budget, wedding ideas purple, wedding ideas blue…etc..


Click on either the search button to continue with your search or you can choose one from the list that appears. You’re then brought to those keywords that matched your search.
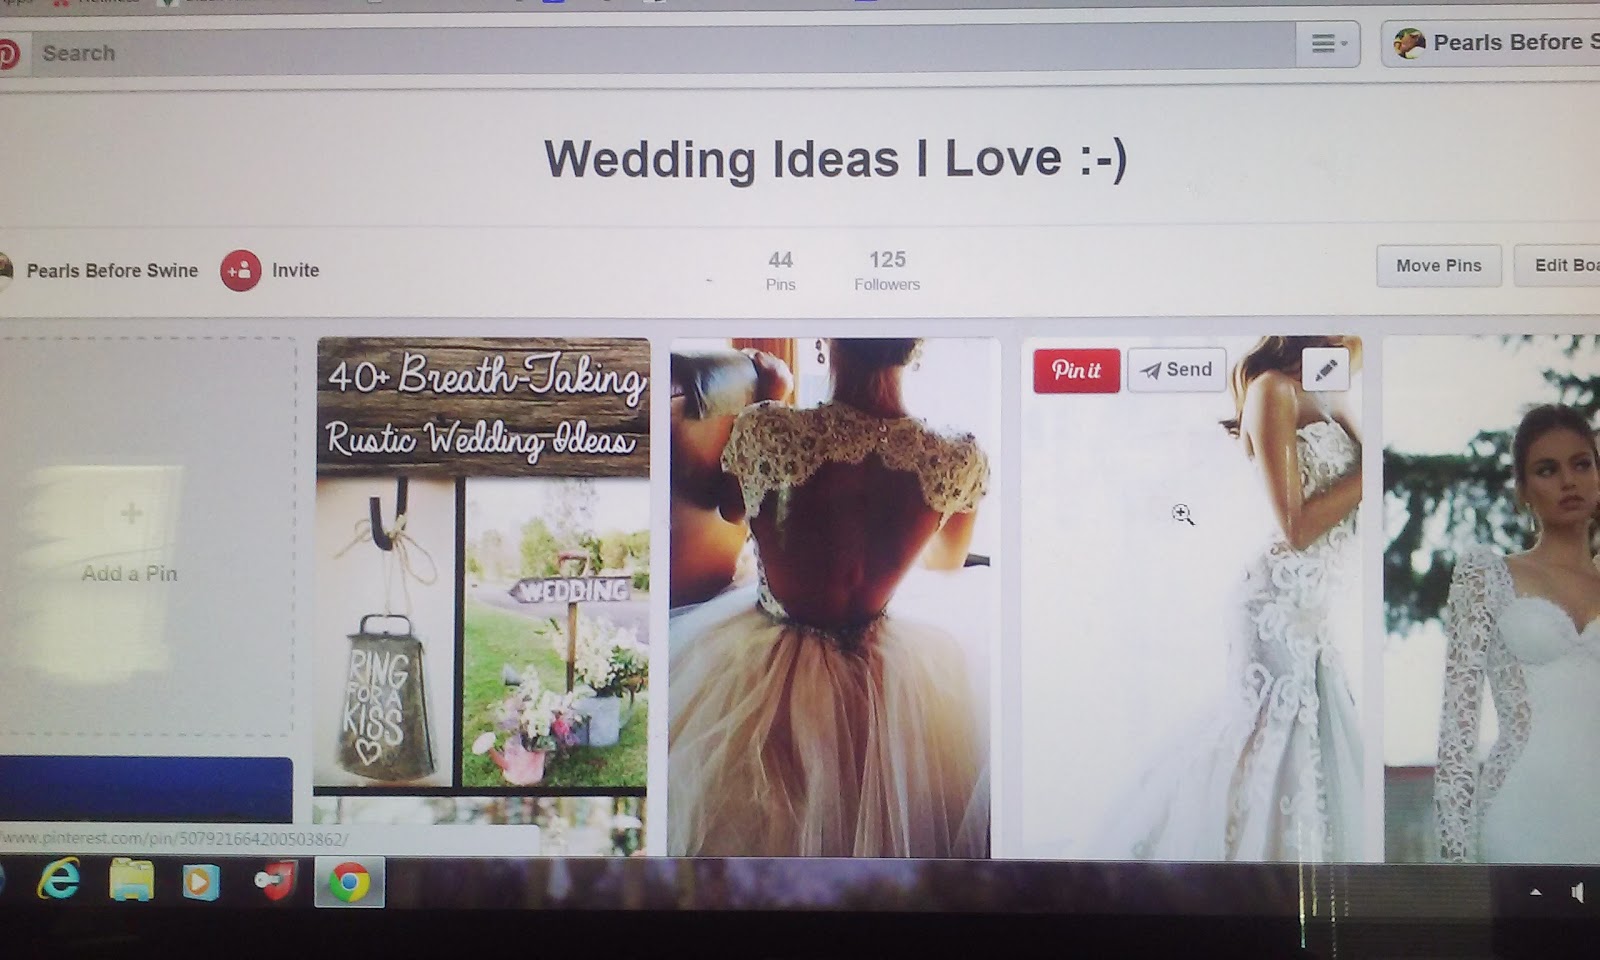
One of the boards I created was, Wedding Ideas I love. Today, I’ll show you step by step how to pin to a specific board. We’ll use this board below.


From this board you can search an idea, search a category or per picture above, you can
 Add a Pin.
If you click on, add a Pin. This box pops up and asks, do you want to pin from the web or your device. Which would be your phone, your computer; laptop, kindle or what have you.


If you choose web, you are then brought to your internet search page and you can do a search for a specific website that you like. You can search the internet for what you’re looking for, most website now have a pin it button.


Just click the pin it button and you’re brought to a page for you to pick the board you want to pin to. It’s
that easy.


I really liked this rustic wedding ideas pin and so I’m going to pin it to my board called Wedding ideas I love.


A confirmation will popup and say Saved to and the board you saved that pin to.
Now if you are like me and are super busy. I will quickly skim my home feed or a category I like and If I’m running out of time, I will just click on the heart. Which is then saved under my likes on my main board. page.


Saved here -----v


Below is a picture of it saved under my likes. I really do need to go through these. Oh my!!
Whatever is highlighted red is where you are. So as you can see, my likes are red and if you look, there is that rustic wedding ideas pin that I liked.


If you remember, we pinned this as well into Wedding Ideas I love and from the picture, you can see that has been pinned as well.


Now you can just keep creating more boards and pinning your little hearts out. I love Pinterest, I’ve found more ideas and DIY’S, then you can shake a stick at and a ton of really useful information. Health, home, family, baking, cars, guns….it doesn’t matter. It’s there and ready for you to pin it.
If you found this helpful or have any questions, I’m here to help. Reach out to me via email, Pinterest or Facebook. I’ll do my best to help and really want this fun for all.
If I missed something and or you just need more information, reach out to me…again I’m here and willing to help. No question is stupid and we’ve all been there.
Thank you so much for reading, and please share if you think it may be useful to someone else!
Much love, Jenny